Sunday, March 24, 2013

Mass Schedule: Cathedral or Saint Elizabeth of Metropolitan Cathedral in Iloilo City


Here are the mass schedules of Cathedral or the Saint Elizabeth Metropolitan Cathedral.

Location: Plaza Jaro, Iloilo City

Mass Schedules:

Daily

05:30 am          Hiligaynon
06:00 am          English
06:30 am          Hiligaynon
05:15 pm          English
05:30 pm          Hiligaynon

Sunday

05:00 am          Hiligaynon
06:30 am          English
08:00 am          Hiligaynon
09:30 am          English
12:00 pm          English (noon)
03:00 pm          English
04:30 pm          Hiligaynon
06:00 pm          Hiligaynon
07:30 pm          English

Disclaimer: The mass schedules above are listed to the best of my knowledge and can change anytime depending on the management. 

Read More

Friday, March 22, 2013

Mass Schedule: Parish of Our Lady of Perpetual Help (St. Clements) in Iloilo City


Here are the mass schedules of the St. Clements or Parish of Our Lady of Perpetual Help.

Location: La Paz, Iloilo City

Mass Schedules:

Daily

06:00 am          Hiligaynon
05:30 pm          English

Sunday

06:00 am          Hiligaynon
07:30 am          Hiligaynon
09:00 am          English
10:30 am          English
03:00 pm          Hiligaynon
04:30 pm          English
06:00 pm          English

Disclaimer: The mass schedules above are listed to the best of my knowledge and can change anytime depending on the management. 
Read More

Monday, March 18, 2013

Roman Catholic Church Mass Schedules at Molo, Iloilo City

Here are the mass schedules of the Parish of St. Anne.

Location: Plaza Molo, Iloilo City

Mass Schedules:

Daily

05:30 am          English
05:30 pm          Hiligaynon

Sunday

05:30 am          Hiligaynon
06:30 am          Hiligaynon
08:00 am          English
10:00 am          English
03:00 pm          Hiligaynon
05:00 pm          Hiligaynon
06:30 pm          English

Here are the mass schedules of the Parish of the Immaculate Conception (Tanza).

Location: Ledesma-Rizal Sts, Iloilo City

Mass Schedules:

Daily

06:00 am          English
05:30 pm          Hiligaynon (Wednesday only)
05:30 pm          Hiligaynon (Saturday only)

Sunday

05:30 am          Hiligaynon
07:00 am          Hiligaynon
08:30 am          English
10:00 am          English
05:30 pm          Hiligaynon
06:30 pm          English

Disclaimer: The mass schedules above are listed to the best of my knowledge and can change anytime depending on the management. 

Read More

Saturday, March 16, 2013

Mass Schedule: Parish of St. Therese of the Child Jesus in Iloilo City

Here are the mass schedules of the Parish of St. Therese of the Child Jesus.

Location: De Leon St., Iloilo City

Mass Schedules:

Daily

06:00 am          Hiligaynon
06:00 pm          Hiligaynon

Sunday

05:00 am          Hiligaynon
06:30 am          Hiligaynon
08:00 am          Hiligaynon
09:00 am          Hiligaynon
11:00 am          English
04:30 pm          Hiligaynon
06:00 pm          Hiligaynon
07:30 pm          English

Disclaimer: The mass schedules above are listed to the best of my knowledge and can change anytime depending on the management. 
Read More

Thursday, March 14, 2013

Resetting or Reformatting Your Samsung Galaxy Y GT-S5360 Guide with Pictures

Here's another one of my not-so-tech-savvy guide in restoring the Samsung Galaxy Y GT-S5360 to factory settings.

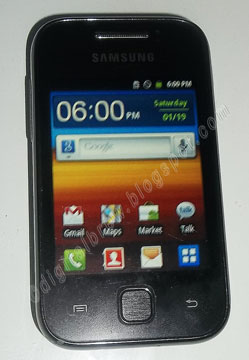
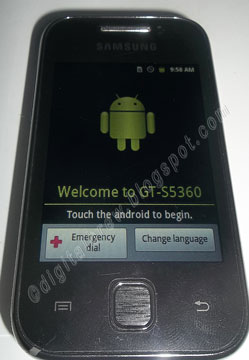
This is how your Samsung Galaxy Y GT-S5360 looked like when you first got it. This also how it should look like once you're done doing a factory settings reset.
The reasons to Reset/ Reformat/ Restore the Samsung Galaxy Y into its original settings may be the following:

1. You want to change the Gmail account used by the phone when connecting to Google Play store. This happens a lot when you weren't the first one to tinker with the phone. For instance, all my nieces' phone use their dad's Gmail account, so restoring it to factory data settings just makes complete sense.

2. You want to resell your Samsung Galaxy Y and prefer all your old data and settings completely wiped out.

3. You installed a program or Google Play Store application that somehow messed up your phone.

There are other reasons why users of the Samsung Galaxy Y would want a reset. However, it's also understandable that they won't go through with it for the fear of the unknown. This blog post is all about showing you what exactly happens when you reset your Samsung Galaxy Y to factory settings.
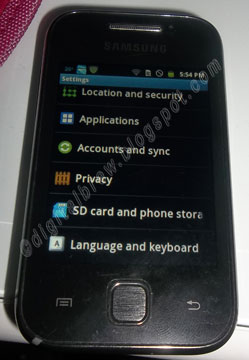
Step 1. Access your phones Menu (that would be the Blue Window-like Square normally on the bottom right corner of the screen) and find the settings.

This is how the Settings Menu should look like.
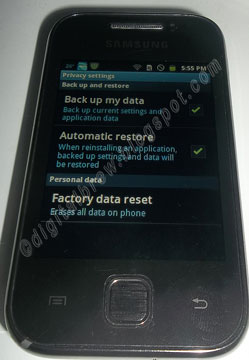
Step 2. Access the Privacy Settings then Factory Data Reset

Expect that all your Galaxy Y's data will be totally wiped out except for the data in your SD card (if you didn't check the Format SD Card option.)
Note: Although the reformatting and resetting process doesn't take that long, it's still best to have your Samsung Galaxy Y's battery charged.

Note 2: Just in case you're debating whether to leave the sim card in or not, take it out before doing the reset. Although it isn't affected by the process, it's always better to be SAFE THAN SORRY.

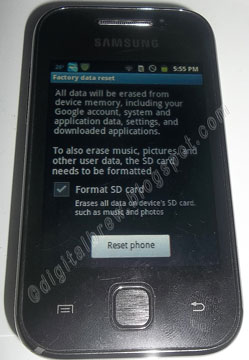
Step 3. You may leave the SD card contents intact by leaving this portion unchecked.

As I have mentioned above, you will be given the option to Format SD Card.

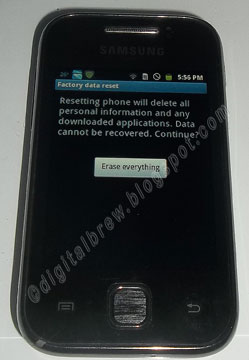
The process of  doing a factory data reset on the Samsung Galaxy GT-S5360 is pretty self explanatory with this picture.

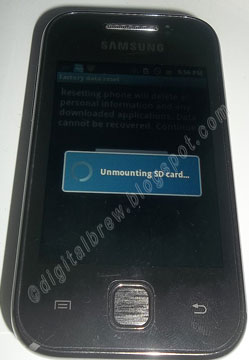
Step 4. Now, we wait....

I had the Format SD Card unchecked so the phone unmounted it.

If my understanding is correct, it requires a reboot so that all the processes it was running with will be turned off.

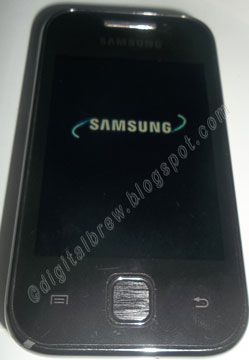
The very familiar Samsung Galaxy Young start-up screen.

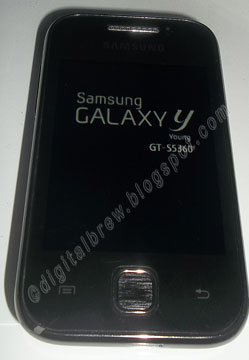
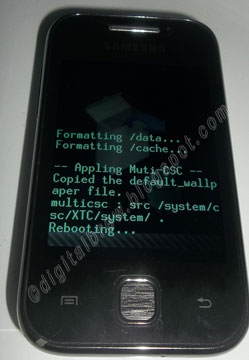
This is the part you won't normally see during normal reboot. Expect this screen to show up if you do a Factory Reset.

A clear indication that the GT-S5360 factory data reset went through without a hitch.
Step 5. Follow the remaining instructions starting with the picture above and you're good to go. Good luck!

Read More

Saturday, February 9, 2013

Upgrading the Lenovo IdeaPad K1 to Jellybean (K1_JB_AOSP) Newbie Guide with Pictures

Remember when the news came out that Lenovo decided to release a Ice Cream Sandwich stock Vanilla for the Lenovo Ideapad. Everybody was happy. Then they found out that the stock ICS did not have Google Play Store! They've also advised mainstream users (and those who aren't familiar with tinkering with their Android OS) to basically stay away from it.

Coincidentally, my Lenovo IdeaPad K1 dies out on me. I have not used it for more than a month because it didn't charge nor did it indicate any signs of life. So today, I just decided to give it a try and holy cow!

Before anything else, let me explain what I have in hand and what to expect...

1. My Lenovo IdeaPad K1 had the original Honeycomb OS...Android OS 3.1
2. I didn't have a microSD card (These first two reasons are why CWM's Jellybean version was out of the question).

Note: According to my understanding, CWM will only work if you have an external micro-SD card and you have the Clockwork Mod Recovery (a package included in Krook1's Android ROM).

3. I have an IdeaPad K1 tablet that's at least 70% charge.
4. Expect that all data will be wiped out, except for the one in your microSD card.
5. Expect that the signal strength for Wi-Fi is messed up. It doesn't show any signal even when you're already connected to a network

Issues I've come across while upgrading the IdeaPad K1 tablet to Jellybean...

1. I tried running NvFlash in Windows 7 by double-clicking the flash-win.bat (and even dragging the batch file to the command window and pressing enter), but nothing seems to happens!

Note: I already disabled my anti-virus and User Account Control (UAC) was off too.

2. I thought I got stuck during the "Formatting partition 12" but I waited a bit and it got to 13. Just in case you get stuck at "Formatting partition 12", just close it and repeat the process.

This is what I meant about getting stuck at Formattiing partition 12. No worries, all you have to do is close it and repeat IF you do get stuck.

3. Although my Lenovo IdeaPad K1 does not show itself in Windows XP, this was what I used to upgrade to Jellybean or Android OS 4.1.1

Once again, the reason why I am doing this is because I hope to help newbies like me.
Nvflash version
1. Download one of the packages above and extract it to a directory 
2. Power off device
3. Press and hold both the Vol + and Vol - buttons
4. While holding both Volume buttons power the tablet on
5. The screen should go black and the two front LED's should remain lit. You are now in APX mode
6. Connect your device to USB
7a) Windows: Install the APX drivers from the 'drivers' folder
Double click the 'flash-windows.bat' file
7b) Linux: run 'chmod +x flash-linux.sh && sudo ./flash-linux.sh' from the extracted directory
Credit goes to Khanning. These instructions were taken from the Lenovo Community Forum on the [ROM][JB][AOSP]. 
Just in case you run through issues not mentioned in this post, don't hesitate to visit the forum. There's 26 pages worth of discussions about the K1_JB_AOSP
Step 1. Downloading the package... The one I used was the NvFlash version since I didn't have an SD card or the Krook1's Clockwork Mod.


This is that same link used on the forum. It's approximately 198MB in size with an MD5 of f15609a8bd98d0a39f838b29f0c6df59. MD5 is an attribute (checksum) given to a file so that others will be able to verify whether it was tampered with or not.

Step 1.1: The K1_JB_AOSP.zip should be extracted out, preferably to the Desktop.

As you could see, I extracted mine in the Desktop. Ignore the red arrows for now.
Step 2. Pretty self-explanatory. Long press the power button and wait for the "Shut Down" or "Power Off" message and press OK.

Step 3 & 4. Now that it's off, press the Vol + and Vol - button. Don't let go. Press the power button and wait for the lights on your IdeaPad K1 (beside the menu button) to remain lit. Once it's on, give it 5-10 more seconds and let go of the Power Button.

Note: I made a mistake of letting the power button go so soon that it booted to start up.

Step 5: Checklist for the IdeaPad K1 to be on APX mode.

-Black Screen (Check)
-Tiny Lights on Both Sides of the Menu Button ON (Check)

Step 6. Picture Time!

This is what APX mode looks like. I already took the liberty of attaching the USB  for the next processes.
Step 7. Look for the folder where you extracted the K1_JB_AOSP.zip. Assuming you clicked on Desktop without typing in a folder for it to be extracted to, the contents of the zip will be on the desktop.

Step 7.1: Double-click on the flash-win.bat file in that folder.

Double-click the flash-win.bat file to run it.

Step 8. Sit back and relax. Let NvFlash do its job.

Installing drivers...
Done with installing the NVIDIA USB Boot-recovery driver for Mobile devices.
What you should expect to pop-out in the command window (the black window) while it is flashing your Lenovo IdeaPad K1.

This is how it will appear on your Lenovo IdeaPad K1.
Step 9: Once it is done, you should be seeing this in your screen.

A Shiny X Glowing with Rainbow Colors!
Success! The fruits of your labor has paid off!
Once you've finished the prompts (about primary language and setting up your Gmail), you're good to go.

Now, both of us are enjoying our K1 in Jellybean.

Note: Good news! I was already able to upgrade my Android tablet so that the Wi-Fi signal is visible. If you're interested, please visit my Upgrading Lenovo IdeaPad K1 to CM10.

Read More