Showing posts with label tech talk. Show all posts

Friday, November 14, 2014

Digitally Transforming the Filipino Haggling Tradition

Yesterday, my sister and I went to Divisoria. We were searching for a certain curtain design for their bedroom. As you all know, Divisoria is the place to go when buying anything and everything at an extremely cheap price. The streets were lined with stalls that were filled with hanging Christmas decors, drapes, and--I repeat--anything under the sun.

The Divisoria Experience

After having to deal with the traffic from Recto to Divi, we maneuvered the busy stalls of Puregold to reach Tabora. In Tabora, we checked every single stall, kiosk, and selling space that sold curtains. To our dismay, we didn't find the particular design. Although a little disappointed, we got some great deals on a few yards of U.S. cotton textile. Yes, like any other Filipino, we ended up haggling for the 7 yards of Winnie the Pooh and some other cartoony-designed bed sheet-to-be.

U.S. Cotton sheets cost 85-130 php/yard
Haggling

Haggling has always been part of our culture. We always here phrases like "Last price?" or "No Discount?" or "I'll buy it by bulk if you give it to me at _____". Honestly, even online sellers from OLX/ Sulit, Ayos Dito, and eBay receive text messages like the ones I mentioned above. It's a typical behavior that's neither good nor bad, depending on the haggler's technique and style.

Selling on eBay used to be as easy as bidding and winning.
Filipino Online Shopping

Nowadays, a lot of us have enjoyed the benefits of buying online. For one, you wouldn't have to deal with the heat, the crowded streets, and the pollution of going to Divi. You also save on precious time and fare because the items get delivered at your doorstep (especially in the Manila area). Some online items are even being sold at a cheaper price than in malls. So, it's really no surprise that a lot of us are now going to websites like Lazada and Zalora.

My first Lazada purchase...
Can't Haggle When it's Sold Online

However, like buying an item from a mall or a superstore, all prices are fixed. There's no haggling allowed, because all prices are final. We don't get the opportunity to talk to the online shop's owner, and it can be a bit frustrating at times. Fortunately for us, we are a resourceful race. Some of us wait for sales or marked-downs; others end up using coupons (usually encoded prior to online checkout).

All it Takes is a Keyphrase

iPrice is a site for the thrifty, budget-conscious Filipino. When all the coupons are at your fingertips, readily available at a click of a button, online shopping definitely gets better. So why bother scouring every single blog/website via Google Search when you can go to a single website for the keywords that can slash a price down to a better bargain?

Is Using a Coupon the Same as Haggling?

It's not. However, these two techniques result to a single outcome. We get what we want at a bargain deal.

Some helpful links:

My Lazada Buying Experience
How to Commute to Divisoria
The EBAY Experience: Pros, Cons and some Tips in Buying and Selling
Read More

Wednesday, March 5, 2014

How to Root Samsung Galaxy Y GT-S5360 (Newbie Guide with Pictures)

Last time, I discussed about restoring/ resetting/ reformatting your Samsung Galaxy Y. This helps with problems regarding slow android phones and frequent "forced close" apps.

For one, a friend of mine paid a whopping 250 php simply to have her phone reformatted because she couldn't text or call or do anything functional with it. That's a less-than-5-minute process. Others have actually charged her 500 php when all they had to do was do a hard reset/reformat.

So, for my first tip of the day: LEARN HOW TO REFORMAT/ HARD RESET YOUR SAMSUNG GALAXY Y.

Rooting a Samsung Galaxy Y GT-S5360 is actually easier than rooting a MyPhone A818g
Let's get down to business, shall we.

Rooting... Why should I root my phone? (in layman's words)

To be honest, I've barely rooted my phone. And to be more embarrassingly honest, I have bricked  a MyPhone A818 because I was dying to root it. So why do we root?

1. Rooting your android phone can help you adjust the parameters for which your phone is functioning e.g. kill bloatware and manufacturer apps that hog up battery life.

2. Rooting your Samsung Galaxy Y will allow you to install custom roms. Mine, at the moment, is running on ChobitsDigitalis ROM.

3. Rooting gives you that SuperUser icon that looks so cool because it shows you have the briefest idea of what you just did. Oh, and having superuser rights allow you to download the infamous ClockWorkMod/ ROM Manager.

FAQs:

1. Is rooting the Galaxy GT-S5360 difficult? 

No.

2. Do I need to back up my old files? 

In this case, no. They will remain there. 

However, just to be safe, when it comes to tweaking, rooting or installing custom roms, backing-up your files is an imperative.
3. What do I need to root my Samsung Galaxy Y?

a. your computer, to download the update.zip
b. a USB cable to transfer the files from your download folder to your SD card.
c. a Samsung Galaxy Y that has a minimum charge of 50%
d. your concentration

4. If I accidentally install the update.zip more than once, will I brick my phone?

Not to my knowledge. While doing this article, I actually rooted my Samsung Galaxy Y GT-S5360 3 times. Just don't try it for the sake of testing the theory.

5. Will this update.zip work on Galaxy Y Duos?

I haven't tried it (for the absence of a Duos phone). However, I strongly advice for you to look for a Samsung Galaxy Y Duos root instead. 

How do I root my Samsung Galaxy Y?

1. First, download the update.zip.

2. Attach your USB cable to your computer's USB port with the other end on your phone.

USB Connected notification in android phones.
3. Once you see the notification 'USB Connected', just press it and choose "Connect USB Storage". Press "OK" on the next prompt. Your green Android will turn orange and the phone's memory will become visible under 'Devices with Removable Storage'.

Some devices will have another pop-up message before green Android turns orange. Just press 'OK' if this notification pops out.
4. Copy the update.zip into the main folder.

Main folder just means the very first window that opens when you click on 'Removable Disk'
5. Once done, go to your phone again and select  "Disconnect USB Storage".

6. Turn off your phone in preparation for 'Android System Recovery'.

7. Once it's off, press the Volume Up, Home button and Power Button simultaneously. Once the Samsung Galaxy Y logo appears, just let it go  

8. Using the Volume Button as your scroll keys, just press it to go to "apply update from sdcard". Press the "Home" button to choose the update.zip package.

9. Scroll down again to highlight update.zip. Press "Home" again to install the zip.

Select update.zip. If you accidentally placed the zip file in another folder, just select the folder name (the one with a / after each word) and choose update.zip
10. It's a pretty quick process. Once it's done, your phone will have the message on its screen saying: You've been rooted! Install from sdcard complete.

11. Select "reboot system now" and we're done with rooting. You should now see the superuser icon in your menu.

Viola! Now, you've successfully rooted your Samsung Galaxy Y.
And that's how the cookie crumbles, folks.
Read More

Monday, November 11, 2013

Smartphone Usage Statistics Highlight Its Importance In Our Lives

Smartphone Ownership Infographic


This Infographic is produced by Coupon Audit (provides Toms promo code) and Digital Brew.

Read More

Sunday, October 20, 2013

USB Device Not Found Solution with (Newbie Guide with Pics)

Picture this

-You've successfully downloaded a new custom rom for your android tablet. 

-You've got NVFlash and K1_JB_AOSP or CM9, CM10 and even CM10 v6.1. 

-You've successfully gotten your android device to APX mode which basically means pressing the Power, Volume Up and Volume Down buttons simultaneously for about 30 seconds more or less (as shown in the image below).

The IdeaPad K1 Android tablet in APX Mode.
Then, you attach it to the data cable where one end is on PC's your USB port. You click on flash-win.bat and nothing happens.

Clicking flash-win.bat to install new rom and no response.

-You take it up a notch and open the  "Command" or CMD window

-You see the message 'nvflash.exe' not recognized. You finally figured out that all you needed to do was make sure that your directory on the command window should coincide with where your nvflash.exe is (e.g. if you placed the custom rom's folder in C:\ then your command window should also show C:\(name of flash-win.bat folder)\>)

-You get it all right but are stuck with the dreaded "USB device not found" or "USB device not detected". 

What do you do? Scream and lash out!

Fortunately, there is a simpler solution to this problem. It's basically updating the APX drivers because, believe it or not, Windows 7 and even Windows XP will have the yellow triangle with exclamation point on APX as found in the Device Manager.

Brief Recap

1. Trying to install new rom in android tablet. No response after clicking flash-win.bat

2. Android tablet in APX mode is detected by PC (with bleep sound) but stuck with "USB device not found" when installing new rom.
3. Android tablet connects successfully when turned on, but isn't detected in APX.

4. Nvflash.exe is not recognized.

Note: Simple solution is to save android rom files in a single folder in drive C:\. When opening command window, type "cd .." (without clauses) until left with C:\> . Then type "cd (name of file folder)" to go directly to that directory. Example
C:\Users\Digitalbrew> cd ..
C:\Users> cd ..
C:\> cd K1Wifi_CM10_Flashable_v6.1
C:\K1Wifi_CM10_Flashable_v6>

*Bold letters are what you're supposed to type.

5. NVflash.exe is NOW recognized. But new command window message after running flash-win.bat is 'USB device not found'.
6. Scream and lash out, frustrated with the world.

How to install missing APX drivers succesfully
Step 1: Download the APX drivers.

Step 2: Extract APX Driver files into your Desktop or C:\

Step 3: Put Android tablet (mine is an IdeaPad K1) on APX mode. Attach Android tablet cable to USB Port.

APX driver for Android custom rom installation.
Step 4: Device driver software was not successfully installed because it could not find APX drivers (not yet anyway).

Step 5: Click on Start. Right-click on Computer and go to Properties. Or go to Control Panel> System and Security> System then click on Device Manager. Locate "Other Devices" and Right-click on "APX". Select Update Driver Software...

Step 6. Click on "Browse my computer for driver software"

Step 7: Browse for the location where you saved it. I put it on Desktop (not my computer).

Halfway through installing the APX driver so your Android Tablet baby gets a Cyanogen Mod Rom.
Step 8: Install this driver software anyway.

NVIDIA USB Boot-recovery driver for Mobile devices successfully installed!
Step 9: Scream and lash out, but this time with happier feelings as you won't have more USB issues on installing Clockwork, Khanning or Krook's ROMs anymore (unless your computer or your usb is busted).

Although you might still get stuck in Formatting partition 12...
Read More

Saturday, September 28, 2013

Upgrading Lenovo IdeaPad K1 to CM10 v6.1 (Newbie Guide w/ Pictures)

Finally, a new addition to my Android Newbie Guide posts.
This is how the K1 will end up looking like once you've successfully installed CM10 v6.1 for Lenovo's K1
It has been a month since I have used my IdeaPad K1 because of the "Sleep of Death". It just went on and on and on twirling those colors on the Jellybean logo.

Since I didn't mind wiping it out again, I didn't do a back-up anymore. However, the process I used in upgrading the Lenovo IdeaPad K1 to CM10 v6.1 didn't wipe out my programs. I even retained my saved games.

What if my IdeaPad K1 has existing issues or problems?

My tablet was still experiencing the sleep of death after installing CM10 so I did the entire process again. However, I did a 'wipe data/factory reset' prior to upgrading.

Note: If you have important data, settings and game saves, make sure to do a back-up before doing this. Assuming you haven't installed CM10 for IdeaPad K1 yet, it's better safe than sorry.

Installing CyanogenMod on the Lenovo Android tablet was a lot easier than I anticipated. Although, it did take me two days to figure things out. I finally found the easiest way to install it based on my current set-up where my IdeaPad K1 had K1_JB_AOSP previously.

What's new with CM10 v6.1 (JB 4.1.2 JZO54K)?

According to the XDA Forum, here are its features:
  • Wifi+GPS
  • HD video/audio
  • External SD
  • Gyro
  • Camera front/back
  • Bluetooth
  • Google Now with voice, Chrome
  • Internal SD (fixed in v2)
  • Paid apps (fixed in v2)
  • Auto brightness, Wifi button in notification bar (fixed in v3)
  • Overclock (1.2, 1.4Ghz) (v5)
  • USB Storage - MTP only (v5)
  • Tun.ko VPN support (v5)
  • 3G (v5)Gapps Without Picasa
  • Rotate lock switch (v6)
  • Home button (v6)
The v2,v3... v5, v6 indicate when these new features or fixes were added in the CM10 for IdeaPad K1.

Note: I tried following the instructions in the forum for 'any other rom' installation. Alas, I spent a day epic-ly  failing at it.  Whether it was because I am using Windows 7 or my buggy USB port, I have no idea. The flash-win did not want to run even upon installing Android SDK.

Important Note: Before we go any further, please remember that modding your android tablet shall be at your own risk. I will not be held responsible if you damage or brick your IdeaPad tablet in the process.

What We Need...

1. A computer to download the images (zip files) listed below.

CWM Flashable image v6.1 for Wifi (md5: b46a0a5fbe2a20718574b4d2b8eba233)
-- My K1 doesn't have 3G (or a sim slot) so I chose the one for Wi-Fi.

-- Just choose between the two Gapps option.

2. A Working IdeaPad K1 with Play Store to download the Rom Manager
-- You can either click on the link or search it once you've opened your IdeaPad K1's Google App Store.

This is how Rom Manager would look like if it is installed correctly.
3. An external SD card to save the two zip files from item 1.

How to Upgrade Lenovo IdeaPad K1 Jellybean to CM10 v6.1

1. Download CWM Flashable image v6.1 for Wifi and Gapps with Picasa (or Gapps without Picasa) to your computer.

2. Save the two zip files (also called flashable images) into your microSD card. Place the microSD card into the IdeaPad K1's slot.
Note:  It doesn't matter if your SD card has content or if you saved the files in one specific folder. Just make sure you're able to access this folder.

You may also attach the K1's USB to copy these files to your microSD card while it is still in your IdeaPad.

3. Download Rom Manager from the Play Store.
Note: My Lenovo IdeaPad K1 is already running with Jellybean (rooted). I installed it using K1_JB_AOSP as mentioned in my previous guide. This means it already has Super User access which will be asked later.

4. Open the successfully installed Rom Manager and follow the steps.

To install a new rom, it says that it will need ClockworkMod Recovery.  Just press OK.
5. Select ClockworkMod Recovery under Install or Update Recovery.

Assuming you won't be shown the main screen of the Rom Manager yet, expect to be directed from the above image to this one.
6. It will ask you to choose the Android tablet model / phone model you are using.  Since the K1 isn't one of the choices, just select "Device Not Listed Above"

It will inform you that the IdeaPad K1 does not have an officially supported ClockworkMod Recovery.
Kindly ignore the arrow on this one. Just press YES!
Note: Truth be told, I had no idea what to press. I just decided to select 'Yes' and go for ClockworkMod 2.x when the Confirm Version message box popped out.

Upon selection, the bottom picture should appear. Bigger picture shows that my Rom Manager's currect recovery is ClockworkMod 2.x.x.x. 
6. Now that that's done, press 'Reboot into Recovery' and we're good to go!

Once you press Reboot into Recovery, it will ask you for a second time. Just press OK and Allow as indicated in these two screens.
7. Now that we're on Recovery Mode, we have to install the zip files we just saved in our microSD card.

Just follow the steps for both zip files. Use the Volume keys for up and down, Home key as 'enter', Power key as 'cancel' or 'escape'.
Step 1: Choose install zip from sdcard
Step 2: Choose zip from external sdcard (since we used a a microSD for our files). It's not advisable to save these files into your main memory as it might get corrupted while doing the process thereby bricking your tablet.
Step 3: Select the CM10 Flashable zip.
Step 4: Select Yes.

I videoed the entire installation process and it took less than a minute to be done with.
Step 5: Follow Step 1 and Step 2 (based on the picture above Step 1).
Step 6: When you get to Step 3, select Gapps.
Step 7: Scroll down again to "Yes- Install..."

Given that you'd successfully installed both zip files (K1WiFi_CM10_Flashabable_v6.1.zip and gapps-jb-picasa...), you should have this screen.
8. It's time to reboot and enjoy the fruits of your labor. A successful installation will show the CyanogenMod logo followed by a message box saying "Android is upgrading..."

Your Android tablet may have looked like it had been rebooted for the first time but it will still have your wallpaper down to the apps you have installed.

Things I have noticed with CyanogenMod CM10 for Lenovo IdeaPad K1 at first glance:

a. WiFi signal indicator is back. No need to second guess whether you are connected or not.

b. My game saves have remained intact. I opened them and my Cut the Rope boxes still have 3 stars in them. City Island also has the same buildings built in them.

c.  I now have a "Terminal Emulator", DSP Manager and Apollo (I think) in my Apps Menu.
d. There are certain additions to the Settings such as a Launcher category under Interface where you can FINALLY change the number of Homescreens! 

There's also a whole lot of customization you can do with Lock Screen, Theme, System. and Profile. I have yet to tinker with Overclocking.

e. You can choose "No Wallpaper" now! I chose a Cyanogen one to honor the great brewer of ROM that is Krook1.

Read More

Friday, June 28, 2013

How to Change Sim 1 & Sim 2 Message Ringtone in Cherry Mobile Flare (with Pics)

 This is a follow-up to one of the questions asked in my post regarding the Cherry Mobile Flare Update
Chilo Chua commented...
Bossing is it possible ba na magkaroon ng magka-ibang message alert tone ang sim 1 and sim 2?
Since I wasn't a big fan of reading manuals, I decided to search for an Android app that could do this. To which I failed in epic proportions!

Well, here's the thing. I just found out about it awhile ago (BY ACCIDENT). LOL. Forgive me for my ignorance.

Anyway, for those who are asking how to change Cherry Mobile Flare's message ringtone for Sim 1 and Sim 2, here it is.

1. Press the message icon to access your SMS.

Feel free to ignore the adorable looking puppy that's enjoying our slippers.
2. Press the highlighted icon (based on the Flare image below) so you can press on the "settings" tab next.

Changing the Cherry Mobile Flare SMS Ringtone Settings Step 2.
3. Press "Settings" and scroll down.

This one's a little blurry. 
4. Under "Notifications" you will find "Select SIM1 ringtone" and "Select SIM2 ringtone"

Finally, a chance to change Sim 1 and Sim 2 message ringtone.
There you can select between Cherry Mobile Flare's music and your own Media Music collection.

Media Music, anyone?

Read More

Thursday, March 14, 2013

Resetting or Reformatting Your Samsung Galaxy Y GT-S5360 Guide with Pictures

Here's another one of my not-so-tech-savvy guide in restoring the Samsung Galaxy Y GT-S5360 to factory settings.

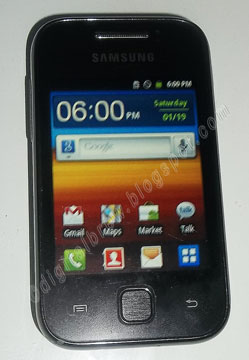
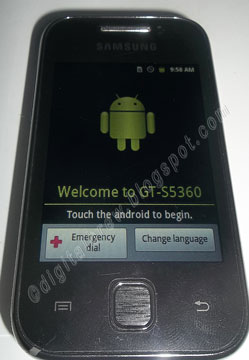
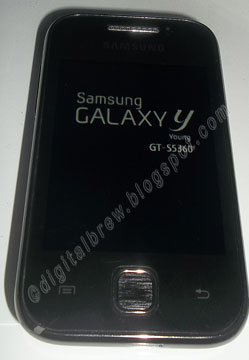
This is how your Samsung Galaxy Y GT-S5360 looked like when you first got it. This also how it should look like once you're done doing a factory settings reset.
The reasons to Reset/ Reformat/ Restore the Samsung Galaxy Y into its original settings may be the following:

1. You want to change the Gmail account used by the phone when connecting to Google Play store. This happens a lot when you weren't the first one to tinker with the phone. For instance, all my nieces' phone use their dad's Gmail account, so restoring it to factory data settings just makes complete sense.

2. You want to resell your Samsung Galaxy Y and prefer all your old data and settings completely wiped out.

3. You installed a program or Google Play Store application that somehow messed up your phone.

There are other reasons why users of the Samsung Galaxy Y would want a reset. However, it's also understandable that they won't go through with it for the fear of the unknown. This blog post is all about showing you what exactly happens when you reset your Samsung Galaxy Y to factory settings.
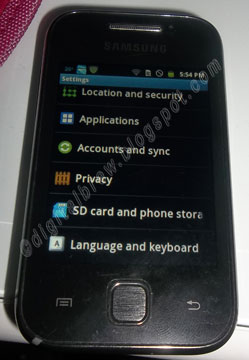
Step 1. Access your phones Menu (that would be the Blue Window-like Square normally on the bottom right corner of the screen) and find the settings.

This is how the Settings Menu should look like.
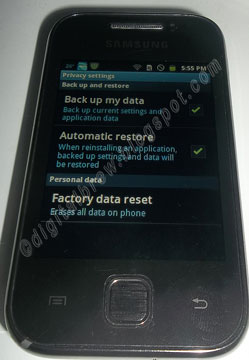
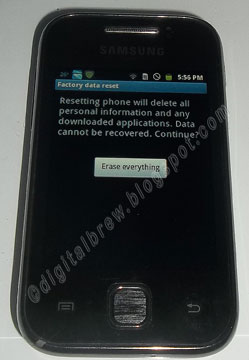
Step 2. Access the Privacy Settings then Factory Data Reset

Expect that all your Galaxy Y's data will be totally wiped out except for the data in your SD card (if you didn't check the Format SD Card option.)
Note: Although the reformatting and resetting process doesn't take that long, it's still best to have your Samsung Galaxy Y's battery charged.

Note 2: Just in case you're debating whether to leave the sim card in or not, take it out before doing the reset. Although it isn't affected by the process, it's always better to be SAFE THAN SORRY.

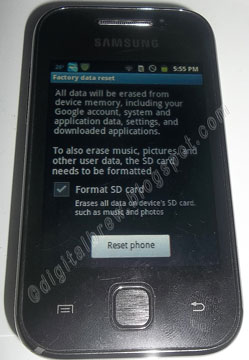
Step 3. You may leave the SD card contents intact by leaving this portion unchecked.

As I have mentioned above, you will be given the option to Format SD Card.

The process of  doing a factory data reset on the Samsung Galaxy GT-S5360 is pretty self explanatory with this picture.

Step 4. Now, we wait....

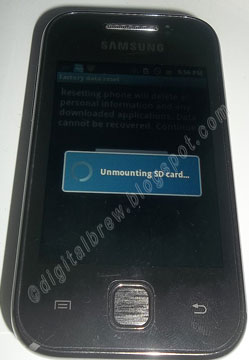
I had the Format SD Card unchecked so the phone unmounted it.

If my understanding is correct, it requires a reboot so that all the processes it was running with will be turned off.

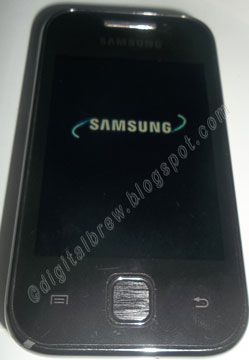
The very familiar Samsung Galaxy Young start-up screen.

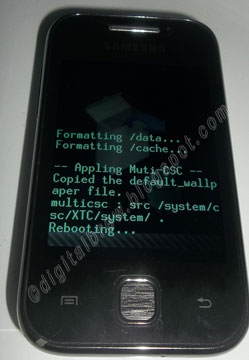
This is the part you won't normally see during normal reboot. Expect this screen to show up if you do a Factory Reset.

A clear indication that the GT-S5360 factory data reset went through without a hitch.
Step 5. Follow the remaining instructions starting with the picture above and you're good to go. Good luck!

Read More

Saturday, February 9, 2013

Upgrading the Lenovo IdeaPad K1 to Jellybean (K1_JB_AOSP) Newbie Guide with Pictures

Remember when the news came out that Lenovo decided to release a Ice Cream Sandwich stock Vanilla for the Lenovo Ideapad. Everybody was happy. Then they found out that the stock ICS did not have Google Play Store! They've also advised mainstream users (and those who aren't familiar with tinkering with their Android OS) to basically stay away from it.

Coincidentally, my Lenovo IdeaPad K1 dies out on me. I have not used it for more than a month because it didn't charge nor did it indicate any signs of life. So today, I just decided to give it a try and holy cow!

Before anything else, let me explain what I have in hand and what to expect...

1. My Lenovo IdeaPad K1 had the original Honeycomb OS...Android OS 3.1
2. I didn't have a microSD card (These first two reasons are why CWM's Jellybean version was out of the question).

Note: According to my understanding, CWM will only work if you have an external micro-SD card and you have the Clockwork Mod Recovery (a package included in Krook1's Android ROM).

3. I have an IdeaPad K1 tablet that's at least 70% charge.
4. Expect that all data will be wiped out, except for the one in your microSD card.
5. Expect that the signal strength for Wi-Fi is messed up. It doesn't show any signal even when you're already connected to a network

Issues I've come across while upgrading the IdeaPad K1 tablet to Jellybean...

1. I tried running NvFlash in Windows 7 by double-clicking the flash-win.bat (and even dragging the batch file to the command window and pressing enter), but nothing seems to happens!

Note: I already disabled my anti-virus and User Account Control (UAC) was off too.

2. I thought I got stuck during the "Formatting partition 12" but I waited a bit and it got to 13. Just in case you get stuck at "Formatting partition 12", just close it and repeat the process.

This is what I meant about getting stuck at Formattiing partition 12. No worries, all you have to do is close it and repeat IF you do get stuck.

3. Although my Lenovo IdeaPad K1 does not show itself in Windows XP, this was what I used to upgrade to Jellybean or Android OS 4.1.1

Once again, the reason why I am doing this is because I hope to help newbies like me.
Nvflash version
1. Download one of the packages above and extract it to a directory 
2. Power off device
3. Press and hold both the Vol + and Vol - buttons
4. While holding both Volume buttons power the tablet on
5. The screen should go black and the two front LED's should remain lit. You are now in APX mode
6. Connect your device to USB
7a) Windows: Install the APX drivers from the 'drivers' folder
Double click the 'flash-windows.bat' file
7b) Linux: run 'chmod +x flash-linux.sh && sudo ./flash-linux.sh' from the extracted directory
Credit goes to Khanning. These instructions were taken from the Lenovo Community Forum on the [ROM][JB][AOSP]
Just in case you run through issues not mentioned in this post, don't hesitate to visit the forum. There's 26 pages worth of discussions about the K1_JB_AOSP
Step 1. Downloading the package... The one I used was the NvFlash version since I didn't have an SD card or the Krook1's Clockwork Mod.


This is that same link used on the forum. It's approximately 198MB in size with an MD5 of f15609a8bd98d0a39f838b29f0c6df59. MD5 is an attribute (checksum) given to a file so that others will be able to verify whether it was tampered with or not.

Step 1.1: The K1_JB_AOSP.zip should be extracted out, preferably to the Desktop.

As you could see, I extracted mine in the Desktop. Ignore the red arrows for now.
Step 2. Pretty self-explanatory. Long press the power button and wait for the "Shut Down" or "Power Off" message and press OK.

Step 3 & 4. Now that it's off, press the Vol + and Vol - button. Don't let go. Press the power button and wait for the lights on your IdeaPad K1 (beside the menu button) to remain lit. Once it's on, give it 5-10 more seconds and let go of the Power Button.

Note: I made a mistake of letting the power button go so soon that it booted to start up.

Step 5: Checklist for the IdeaPad K1 to be on APX mode.

-Black Screen (Check)
-Tiny Lights on Both Sides of the Menu Button ON (Check)

Step 6. Picture Time!

This is what APX mode looks like. I already took the liberty of attaching the USB  for the next processes.
Step 7. Look for the folder where you extracted the K1_JB_AOSP.zip. Assuming you clicked on Desktop without typing in a folder for it to be extracted to, the contents of the zip will be on the desktop.

Step 7.1: Double-click on the flash-win.bat file in that folder.

Double-click the flash-win.bat file to run it.

Step 8. Sit back and relax. Let NvFlash do its job.

Installing drivers...
Done with installing the NVIDIA USB Boot-recovery driver for Mobile devices.
What you should expect to pop-out in the command window (the black window) while it is flashing your Lenovo IdeaPad K1.

This is how it will appear on your Lenovo IdeaPad K1.
Step 9: Once it is done, you should be seeing this in your screen.

A Shiny X Glowing with Rainbow Colors!
Success! The fruits of your labor has paid off!
Once you've finished the prompts (about primary language and setting up your Gmail), you're good to go.

Now, both of us are enjoying our K1 in Jellybean.

Note: Good news! I was already able to upgrade my Android tablet so that the Wi-Fi signal is visible. If you're interested, please visit my Upgrading Lenovo IdeaPad K1 to CM10.

Read More