Saturday, March 16, 2013

Mass Schedule: Parish of St. Therese of the Child Jesus in Iloilo City

Here are the mass schedules of the Parish of St. Therese of the Child Jesus.

Location: De Leon St., Iloilo City

Mass Schedules:

Daily

06:00 am          Hiligaynon
06:00 pm          Hiligaynon

Sunday

05:00 am          Hiligaynon
06:30 am          Hiligaynon
08:00 am          Hiligaynon
09:00 am          Hiligaynon
11:00 am          English
04:30 pm          Hiligaynon
06:00 pm          Hiligaynon
07:30 pm          English

Disclaimer: The mass schedules above are listed to the best of my knowledge and can change anytime depending on the management. 
Read More

Thursday, March 14, 2013

Resetting or Reformatting Your Samsung Galaxy Y GT-S5360 Guide with Pictures

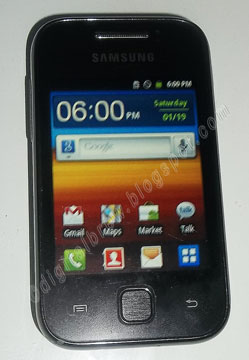
Here's another one of my not-so-tech-savvy guide in restoring the Samsung Galaxy Y GT-S5360 to factory settings.

This is how your Samsung Galaxy Y GT-S5360 looked like when you first got it. This also how it should look like once you're done doing a factory settings reset.
The reasons to Reset/ Reformat/ Restore the Samsung Galaxy Y into its original settings may be the following:

1. You want to change the Gmail account used by the phone when connecting to Google Play store. This happens a lot when you weren't the first one to tinker with the phone. For instance, all my nieces' phone use their dad's Gmail account, so restoring it to factory data settings just makes complete sense.

2. You want to resell your Samsung Galaxy Y and prefer all your old data and settings completely wiped out.

3. You installed a program or Google Play Store application that somehow messed up your phone.

There are other reasons why users of the Samsung Galaxy Y would want a reset. However, it's also understandable that they won't go through with it for the fear of the unknown. This blog post is all about showing you what exactly happens when you reset your Samsung Galaxy Y to factory settings.
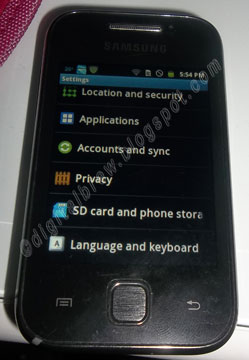
Step 1. Access your phones Menu (that would be the Blue Window-like Square normally on the bottom right corner of the screen) and find the settings.

This is how the Settings Menu should look like.
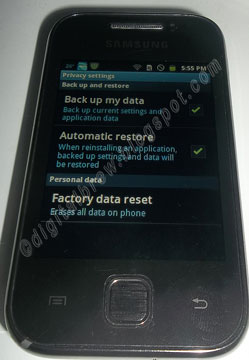
Step 2. Access the Privacy Settings then Factory Data Reset

Expect that all your Galaxy Y's data will be totally wiped out except for the data in your SD card (if you didn't check the Format SD Card option.)
Note: Although the reformatting and resetting process doesn't take that long, it's still best to have your Samsung Galaxy Y's battery charged.

Note 2: Just in case you're debating whether to leave the sim card in or not, take it out before doing the reset. Although it isn't affected by the process, it's always better to be SAFE THAN SORRY.

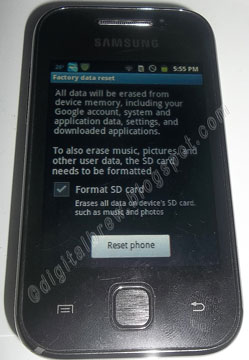
Step 3. You may leave the SD card contents intact by leaving this portion unchecked.

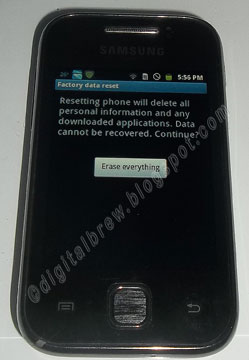
As I have mentioned above, you will be given the option to Format SD Card.

The process of  doing a factory data reset on the Samsung Galaxy GT-S5360 is pretty self explanatory with this picture.

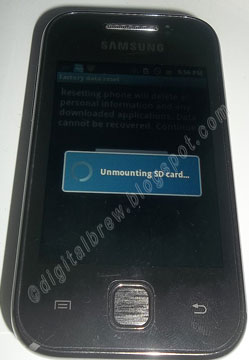
Step 4. Now, we wait....

I had the Format SD Card unchecked so the phone unmounted it.

If my understanding is correct, it requires a reboot so that all the processes it was running with will be turned off.

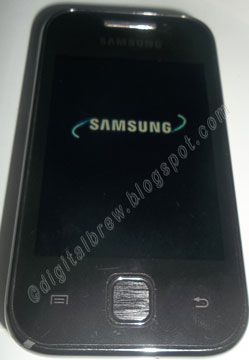
The very familiar Samsung Galaxy Young start-up screen.

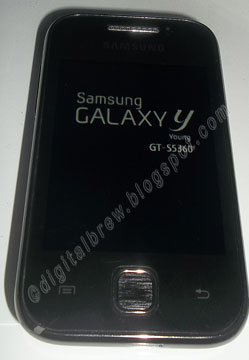
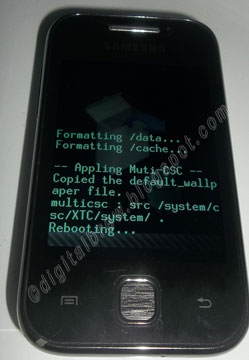
This is the part you won't normally see during normal reboot. Expect this screen to show up if you do a Factory Reset.

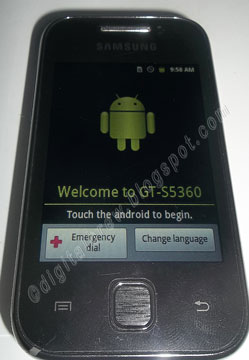
A clear indication that the GT-S5360 factory data reset went through without a hitch.
Step 5. Follow the remaining instructions starting with the picture above and you're good to go. Good luck!

Read More

Saturday, February 9, 2013

Upgrading the Lenovo IdeaPad K1 to Jellybean (K1_JB_AOSP) Newbie Guide with Pictures

Remember when the news came out that Lenovo decided to release a Ice Cream Sandwich stock Vanilla for the Lenovo Ideapad. Everybody was happy. Then they found out that the stock ICS did not have Google Play Store! They've also advised mainstream users (and those who aren't familiar with tinkering with their Android OS) to basically stay away from it.

Coincidentally, my Lenovo IdeaPad K1 dies out on me. I have not used it for more than a month because it didn't charge nor did it indicate any signs of life. So today, I just decided to give it a try and holy cow!

Before anything else, let me explain what I have in hand and what to expect...

1. My Lenovo IdeaPad K1 had the original Honeycomb OS...Android OS 3.1
2. I didn't have a microSD card (These first two reasons are why CWM's Jellybean version was out of the question).

Note: According to my understanding, CWM will only work if you have an external micro-SD card and you have the Clockwork Mod Recovery (a package included in Krook1's Android ROM).

3. I have an IdeaPad K1 tablet that's at least 70% charge.
4. Expect that all data will be wiped out, except for the one in your microSD card.
5. Expect that the signal strength for Wi-Fi is messed up. It doesn't show any signal even when you're already connected to a network

Issues I've come across while upgrading the IdeaPad K1 tablet to Jellybean...

1. I tried running NvFlash in Windows 7 by double-clicking the flash-win.bat (and even dragging the batch file to the command window and pressing enter), but nothing seems to happens!

Note: I already disabled my anti-virus and User Account Control (UAC) was off too.

2. I thought I got stuck during the "Formatting partition 12" but I waited a bit and it got to 13. Just in case you get stuck at "Formatting partition 12", just close it and repeat the process.

This is what I meant about getting stuck at Formattiing partition 12. No worries, all you have to do is close it and repeat IF you do get stuck.

3. Although my Lenovo IdeaPad K1 does not show itself in Windows XP, this was what I used to upgrade to Jellybean or Android OS 4.1.1

Once again, the reason why I am doing this is because I hope to help newbies like me.
Nvflash version
1. Download one of the packages above and extract it to a directory 
2. Power off device
3. Press and hold both the Vol + and Vol - buttons
4. While holding both Volume buttons power the tablet on
5. The screen should go black and the two front LED's should remain lit. You are now in APX mode
6. Connect your device to USB
7a) Windows: Install the APX drivers from the 'drivers' folder
Double click the 'flash-windows.bat' file
7b) Linux: run 'chmod +x flash-linux.sh && sudo ./flash-linux.sh' from the extracted directory
Credit goes to Khanning. These instructions were taken from the Lenovo Community Forum on the [ROM][JB][AOSP]
Just in case you run through issues not mentioned in this post, don't hesitate to visit the forum. There's 26 pages worth of discussions about the K1_JB_AOSP
Step 1. Downloading the package... The one I used was the NvFlash version since I didn't have an SD card or the Krook1's Clockwork Mod.


This is that same link used on the forum. It's approximately 198MB in size with an MD5 of f15609a8bd98d0a39f838b29f0c6df59. MD5 is an attribute (checksum) given to a file so that others will be able to verify whether it was tampered with or not.

Step 1.1: The K1_JB_AOSP.zip should be extracted out, preferably to the Desktop.

As you could see, I extracted mine in the Desktop. Ignore the red arrows for now.
Step 2. Pretty self-explanatory. Long press the power button and wait for the "Shut Down" or "Power Off" message and press OK.

Step 3 & 4. Now that it's off, press the Vol + and Vol - button. Don't let go. Press the power button and wait for the lights on your IdeaPad K1 (beside the menu button) to remain lit. Once it's on, give it 5-10 more seconds and let go of the Power Button.

Note: I made a mistake of letting the power button go so soon that it booted to start up.

Step 5: Checklist for the IdeaPad K1 to be on APX mode.

-Black Screen (Check)
-Tiny Lights on Both Sides of the Menu Button ON (Check)

Step 6. Picture Time!

This is what APX mode looks like. I already took the liberty of attaching the USB  for the next processes.
Step 7. Look for the folder where you extracted the K1_JB_AOSP.zip. Assuming you clicked on Desktop without typing in a folder for it to be extracted to, the contents of the zip will be on the desktop.

Step 7.1: Double-click on the flash-win.bat file in that folder.

Double-click the flash-win.bat file to run it.

Step 8. Sit back and relax. Let NvFlash do its job.

Installing drivers...
Done with installing the NVIDIA USB Boot-recovery driver for Mobile devices.
What you should expect to pop-out in the command window (the black window) while it is flashing your Lenovo IdeaPad K1.

This is how it will appear on your Lenovo IdeaPad K1.
Step 9: Once it is done, you should be seeing this in your screen.

A Shiny X Glowing with Rainbow Colors!
Success! The fruits of your labor has paid off!
Once you've finished the prompts (about primary language and setting up your Gmail), you're good to go.

Now, both of us are enjoying our K1 in Jellybean.

Note: Good news! I was already able to upgrade my Android tablet so that the Wi-Fi signal is visible. If you're interested, please visit my Upgrading Lenovo IdeaPad K1 to CM10.

Read More

Thursday, January 17, 2013

Updating Cherry Mobile Flare with Pics (Newbie Guide)

So, we all know that the Cherry Mobile Flare came with a lot of perks...and flaws. For instance, the FM Radio app wasn't present in its initial build. And there were problems with the G-Sensor and SMS Auto-Rotate.

Some hours ago, I found out that the update to fix these Cherry Mobile Flare issues has been released. Of course, everybody who wanted it badly went through Cherry Mobile's link to Drop Box.

Which turned out to be an epic failure...

Note: I just dropped by Cherry Mobile's site and was glad to see that they finally uploaded it there and a Mirror Site (*cough* Drop Box). 

I have to admit, I'm not the sharpest tool in the shed. So even with the simplest instructions quoted below, I still had to do it twice before I got it right.

1. Save the update file to the root of the SD card. Turn off the phone.  Make sure phone is charged at least 15%.
2. Press and hold Power+volume Up for a few seconds. It will display first a green screen.
3. Release the button after the screen shows a red display to show the Android sytem revocery.
4. Select apply update from external storage' and select the update file. Use volume keys to select and power key to confirm.
5. The phone will update. After update is finish, select reboot system now. 
Source
Here's some additional information on the entire process. Hopefully, I'd be able to help others who are in the same predicament as I was.

UPDATING CHERRY MOBILE FLARE STEP 1 FAQ. Where the hell is this root?

After tethering your phone to your PC, this message should pop out.  Once you click on "Open device to view files", that folder will be the root.
Note: USB mode is expected to be on MTP.

Flare will have the label S100. This is where you're supposed to copy the file that you just downloaded from Cherry Mobile.
UPDATING CHERRY MOBILE FLARE STEP 2 WARNING. Make sure to read all the steps before doing the procedure. I let go of the buttons at step 2 reason why my phone didn't go red as mentioned in Step 3.

UPDATING CHERRY MOBILE FLARE STEP 3. Once your screen turns red (mine was reddish pink than red), that's when you should let go. Now, wait for the screen shown below to appear.
Use the volume key to navigate your way to "apply update from external storage" and press the power button for confirmation

UPDATING CHERRY MOBILE FLARE STEP 4. If my memory serves me right, you'd still need to look for the msm7627a-ota-TBW59.... item (which will probably be the first choice on the next screen) and confirm.

UPDATING CHERRY MOBILE FLARE STEP 5. The phone will update.

Just like this...

Once you get the "Install from sdcard complete." message, just select  "reboot system now".

When your phone is  done rebooting, you should see something like this on your "About phone" menu.

Finally!
I hope this has helped. Please take note that I am no Android expert. Heck, it took me two tries before I got it right. Good luck!

Read More

Tuesday, January 15, 2013

The Lazada (lazada.com.ph) Buying Experience

I was a little hesitant on doing my first online purchase. I've done EBAY and Sulit, but never before have I purchased from an online shop... so Lazada was a first for me.

The Lazada Shopping Experience

I browsed through Lazada with one thing in mind... the much-coveted Cherry Mobile Flare Android phone which they were selling at 3,999 php (discounted at 26% from the original price). Yesterday we came across a Cherry Mobile kiosk and much to our dismay, they were selling the Flare at 4,499 php (or was it 4,599 php). Fortunately for me, I had already done my ordering. (Product Status: Pending ^^)

I would've posted my invoice, but I forgot to do so due to the excitement.

The Lazada Shipping Experience

I ordered the CM Flare phone last Sunday, January 13, 2013 at about 9 or 10 in the evening. I received it at about 4 PM today (January 15, 2013).  Not bad for a 5-day waiting period, don't you think?

The box is sealed with a white sticker etched with the word "VOID". Once you remove that sticker, the word "VOID" will remain on box thereby giving customers the assurance that it was not opened or tampered with.
So mine was delivered at my door step and I paid upon delivery.

What's in the Cherry Mobile Flare box...
Cherry Mobile Flare at my Fingertips

I got my phone in good fully-functional condition (so far, so good). And I just love it (for its price, performance, and my online shopping experience, anyway!).

What you see is what you get! No hidden charges or issues with mishandling.

So just remember, to keep that tax invoice and consignee slip in case something "undesirable" happens (I dare not to mention!).

Read More

Thursday, January 10, 2013

Sarabia Manor Hotel Pool Side at Iloilo City, Philippines

One of my sisters just loves staying at the Sarabia Manor Hotel and Convention Center. The location is nice and there's a convenient store at the bottom. There's also the BPI bank (with an ATM), Ocean City (seafood restaurant) and Coffeebreak (a coffee cafe) just across it.

This is the Sarabia Manor Hotel and Convention Center's pool side
A couple of years ago, my nieces would come to Iloilo every summer to learn swimming at the pool side. They have swimming instructors available in the corner office near the restaurant/cafe area. Back then, they usually charged as low 1,000 to 5,000 php per 10 to 12 sessions (Although, I'll have to confirm this.)

Another one of the many views the Sarabia Manor Hotel Pool Area showcases.
And one last shot of the Sarabia Manor Hotel and Convention Center's pool showing part of the kiddie pool.

The kiddie pool...
You can drop by and check out the place, rates and services at the Sarabia Manor Hotel website.

The Sarabia Manor Hotel and Convention Center is located at 101 General Luna Street, Iloilo City, Philippines. You may contact them at (+6333) 335-1021 to 27 or sarabia_hotel@yahoo.com.ph

Read More